Setup
This guide covers the complete setup process for running VECTRI, including WSL installation for Windows users and the VECTRI model installation on Ubuntu.
🖥️ VECTRI and WSL installation
Follow the WSL Installation tab first to set up Windows Subsystem for Linux, then proceed to the VECTRI Installation tab.
Skip directly to the VECTRI Installation tab if you're already running Ubuntu 22.04 LTS.
🪟 Windows Subsystem for Linux (WSL)
What is WSL?
Windows Subsystem for Linux (WSL) is a feature of Windows that allows you to run a Linux environment directly on Windows, without the need for a separate virtual machine or dual booting.
Why Use WSL for VECTRI?
-
Native Linux Environment
Run Linux commands, tools, and applications directly on Windows without modification.
-
High Performance
WSL 2 uses a real Linux kernel, providing near-native performance for scientific computing.
-
Seamless Integration
Access Windows files from Linux and vice versa. Use VS Code with WSL backend.
-
Full Compatibility
Install and run VECTRI, NetCDF libraries, and all Linux-based scientific tools.
WSL 2 Recommended
WSL 2 is the recommended version for VECTRI as it provides:
- Full Linux kernel compatibility
- Better file system performance
- Full system call compatibility
- Support for Docker and other Linux tools
Prerequisites
Before you start, ensure you have:
- ✅ Administrator access on your PC
- ✅ Hardware virtualization enabled in BIOS/UEFI (Intel VT-x / AMD-V)
- ✅ A reasonably up-to-date Windows build (Windows 10 version 2004+ or Windows 11)
Step 0: Enable Windows Features (GUI Method)
Before installing WSL, you can manually enable the required Windows features:
Enable WSL via Control Panel
- Navigate to Control Panel
- Press
Win + R, typecontrol, press Enter -
Or search "Control Panel" in the Start menu
-
Open Programs and Features
- Click on Programs
-
Click on Programs and Features
-
Turn Windows Features On or Off
- In the left sidebar, click Turn Windows features on or off
-
A dialog box will appear
-
Enable Required Features
- ✅ Tick Virtual Machine Platform
- ✅ Tick Windows Subsystem for Linux
-
Click OK
-
Restart Your Computer
- Windows will apply the changes
- Restart when prompted
How to Open CMD as Administrator
- Press Start (Windows key)
- Type cmd
- Right-click Command Prompt
- Select Run as administrator
Installation Instructions
Quick Install (Recommended)
Windows 11 typically supports the simplest installation path.
Step 1: Install WSL
Open CMD as Administrator and run:
This command:
- ✅ Enables required Windows features
- ✅ Installs the WSL kernel
- ✅ Installs Ubuntu (default distribution)
Step 2: Restart Your Computer
Restart Windows to complete the installation.
Step 3: First Launch
- Open Ubuntu from the Start menu
- Create your Linux username
- Create your Linux password
Step 4: Verify Installation
✅ Confirm your distro shows VERSION 2.
Step 5: Update WSL (Optional but Recommended)
Install Ubuntu 22.04 (Recommended for VECTRI)
Quick Install (Recommended)
Step 1: Install WSL
Open CMD as Administrator and run:
This command:
- ✅ Enables required Windows features
- ✅ Installs the WSL kernel
- ✅ Installs Ubuntu (default distribution)
Step 2: Restart Your Computer
Restart Windows to complete the installation.
Step 3: First Launch
- Open Ubuntu from the Start menu
- Create your Linux username
- Create your Linux password
Step 4: Verify WSL Version
✅ Confirm your distro shows VERSION 2.
Manual Install (If Quick Install Fails)
Use this method if:
- Your Windows 10 build is older
- The one-command install is blocked by policy
Step 1: Enable WSL Feature
Open CMD as Administrator:
Step 2: Enable Virtual Machine Platform
Step 3: Restart Your Computer
Restart Windows.
Step 4: Set WSL 2 as Default
Step 5: Install Ubuntu
- Open Microsoft Store
- Search for Ubuntu
- Install Ubuntu 22.04 LTS (recommended)
Step 6: Launch and Configure
- Open Ubuntu from Start menu
- Create your Linux username and password
🔧 Troubleshooting
Virtualization is Disabled
Symptoms:
- WSL 2 won't start
- Errors referencing Hyper-V or virtualization
Fix:
- Restart your computer and enter BIOS/UEFI settings
- Enable Intel VT-x or AMD-V (virtualization)
- Save and exit BIOS
- Run these commands again:
- Restart Windows
Distro Installed as WSL 1
Check your distro version:
Convert to WSL 2:
Set WSL 2 as default for future installs:
Common WSL Commands
List all installed distros:
Shut down all WSL instances:
Update WSL:
Uninstall a distro (deletes its data):
📦 Post-Install: Prepare Ubuntu for VECTRI
Once inside your Ubuntu terminal, update packages and install essential tools:
📚 Quick Reference: WSL Commands
| Command | Description |
|---|---|
wsl --install | Install WSL + default distro |
wsl --list --online | List available distros |
wsl --install -d Ubuntu-22.04 | Install specific distro |
wsl -l -v | Check installed distros and versions |
wsl --set-default-version 2 | Set WSL 2 as default |
wsl --set-version <Distro> 2 | Convert distro to WSL 2 |
wsl --update | Update WSL |
wsl --shutdown | Shutdown all WSL instances |
wsl --unregister <Distro> | Remove a distro |
📖 Additional Resources
For more detailed WSL tutorials and guides, visit:
- WSL Installation Tutorial - Comprehensive guide with screenshots
- Microsoft WSL Documentation
- WSL GitHub Repository
WSL Installation Complete!
You now have Ubuntu running on Windows. Proceed to the WSL Post-Install tab for Python/Data Science setup, or go directly to the VECTRI Installation tab.
🐍 WSL Post-Install Data Science Setup
Focused on Python, Conda/Mamba, Jupyter, VS Code Remote WSL, and NetCDF/xarray
Prerequisites
This guide assumes you already installed Ubuntu 22.04 LTS via WSL 2 (see the WSL Installation tab).
1️⃣ Update Ubuntu Packages
Open your Ubuntu terminal:
Install core build and utility tools:
2️⃣ Install Miniconda (Recommended)
Download Miniconda:
Install:
Follow prompts, then restart the terminal or run:
3️⃣ Install Mamba (Optional but Recommended)
Mamba is a faster drop-in replacement for conda:
4️⃣ Create a Data Science Environment
Install the core scientific stack:
Package Notes
cartopy,rasterio, and geospatial libs can be heavy; remove them for a lighter environmentcfgrib+eccodeshelps with GRIB workflows
Register the Jupyter kernel:
5️⃣ Install Node.js (Optional)
Required for some Jupyter extensions:
6️⃣ JupyterLab Quick Start
WSL usually auto-forwards localhost links to Windows.
If not, copy the URL and open it in your Windows browser.
7️⃣ VS Code + Remote WSL Workflow
On Windows
- Install Visual Studio Code from code.visualstudio.com
- Install the WSL extension from the Extensions tab
From Ubuntu
Open any folder in VS Code using the WSL backend:
This opens the current folder in Windows VS Code, connected to WSL.
8️⃣ Recommended Folder Structure
Create organized directories inside Ubuntu:
| Folder | Purpose |
|---|---|
~/projects | Code repositories and scripts |
~/data | Climate data, NetCDF files |
~/notebooks | Jupyter notebooks |
9️⃣ Accessing Windows Files
Your Windows drives are mounted under /mnt/:
Access C: drive:
Access your Windows Documents folder:
Best Practice
For performance and fewer path issues, keep active projects in the Linux filesystem (e.g., ~/projects) and only move final outputs to /mnt/c.
🔟 Climate/Geo Add-ons
Additional packages for climate and geospatial analysis:
1️⃣1️⃣ Quick Test Script
Verify your installation:
1️⃣2️⃣ GPU Support in WSL (Optional)
For machine learning with GPU acceleration:
Requirements
- Compatible NVIDIA GPU
- Latest Windows GPU drivers
- NVIDIA CUDA support for WSL
Create a separate environment:
Test GPU availability:
python -c "import torch; print('CUDA available:', torch.cuda.is_available()); print(torch.cuda.get_device_name(0) if torch.cuda.is_available() else 'No GPU')"
🔧 Common Fixes
1️⃣3️⃣ Minimal Alternative (Lighter Environment)
For a lighter setup without geospatial libraries:
📚 Environment Summary
| Environment | Purpose | Key Packages |
|---|---|---|
ds | Full data science | numpy, pandas, xarray, cartopy, geopandas |
light | Minimal setup | numpy, pandas, xarray, matplotlib |
torch | Machine learning | PyTorch with CUDA support |
Post-Install Complete!
Your WSL environment is now ready for data science and climate analysis. Proceed to the VECTRI Installation tab to install the malaria model.
🐳 Docker on WSL 2
Docker enables containerized applications, making it easy to run reproducible environments for scientific computing and VECTRI workflows.
Prerequisites
This guide assumes you already have WSL 2 installed with Ubuntu 22.04 LTS (see the WSL Installation tab).
Confirm WSL 2 is Ready
Open Windows CMD as Administrator:
✅ Your distro should show VERSION 2.
Choose Your Installation Path
-
Path A: Docker Desktop (Recommended)
Easiest setup with GUI management. Best for most users.
-
Path B: Docker Engine Only
Lightweight, command-line only. For advanced users.
Path A: Docker Desktop (Recommended)
Step 1: Remove Old Docker (Optional)
If you have old Docker installations inside WSL, remove them first:
sudo apt remove -y docker docker-engine docker.io containerd runc docker-compose docker-compose-v2 docker-doc podman-docker
Step 2: Install Docker Desktop on Windows
- Download Docker Desktop for Windows from docker.com/products/docker-desktop
- Run the installer
- Start Docker Desktop
Step 3: Enable WSL 2 Engine
In Docker Desktop:
- Go to Settings → General
- ✅ Check Use the WSL 2 based engine
- Click Apply & Restart
Step 4: Enable WSL Integration
In Docker Desktop:
- Go to Settings → Resources → WSL Integration
- ✅ Enable your Ubuntu distro
- Click Apply & Restart
Step 5: Test Docker in Ubuntu
Open your Ubuntu terminal and run:
✅ If hello-world succeeds, Docker is ready!
Best Performance Tip
Always work in the Linux filesystem for best Docker performance:
Why Linux Filesystem?
Docker containers accessing /mnt/c (Windows files) are significantly slower than accessing ~/ (Linux files).
Path B: Docker Engine Inside WSL (Advanced)
This installs Docker directly inside WSL without Docker Desktop.
Step 1: Install Docker Engine
Update packages:
Install prerequisites:
Add Docker's official GPG key:
curl -fsSL https://download.docker.com/linux/ubuntu/gpg | sudo gpg --dearmor -o /etc/apt/keyrings/docker.gpg
Add Docker repository:
echo "deb [arch=$(dpkg --print-architecture) signed-by=/etc/apt/keyrings/docker.gpg] https://download.docker.com/linux/ubuntu $(. /etc/os-release && echo "$VERSION_CODENAME") stable" | sudo tee /etc/apt/sources.list.d/docker.list > /dev/null
Install Docker Engine:
sudo apt-get install -y docker-ce docker-ce-cli containerd.io docker-buildx-plugin docker-compose-plugin
Step 2: Start Docker Daemon
Step 3: Run Docker Without Sudo (Optional)
Add your user to the docker group:
Restart WSL from Windows CMD:
Then reopen Ubuntu.
Step 4: Test Docker
✅ If successful, Docker Engine is ready!
🔧 Troubleshooting
Cannot connect to the Docker daemon
Docker Desktop Path:
- Ensure Docker Desktop is running (check system tray)
- Verify WSL Integration is enabled in Settings
Docker Engine Path:
Permission denied
If you get permission errors:
Then restart WSL:
Docker Desktop vs Docker Engine
| Feature | Docker Desktop | Docker Engine |
|---|---|---|
| GUI | ✅ Yes | ❌ No |
| Resource management | ✅ Easy | Manual |
| Kubernetes | ✅ Built-in | Separate install |
| Memory usage | Higher | Lower |
| Best for | Most users | Advanced/servers |
📚 Essential Docker Commands
| Command | Description |
|---|---|
docker ps | List running containers |
docker ps -a | List all containers |
docker images | List downloaded images |
docker run <image> | Run a container |
docker stop <container> | Stop a container |
docker rm <container> | Remove a container |
docker rmi <image> | Remove an image |
docker compose up -d | Start services (detached) |
docker compose down | Stop services |
docker system prune | Clean up unused resources |
🚀 Quick Start Examples
Run Ubuntu Container
Run Python Container
Run Jupyter Notebook
Then open the URL shown in the terminal.
📖 Additional Resources
Docker Setup Complete!
You now have Docker running on WSL 2. You can use containers for reproducible scientific environments and VECTRI workflows.
🧬 VECTRI Installation Guide
Target OS: Ubuntu 22.04 LTS (native or via WSL)
Purpose: Install all required libraries and build the VECTRI malaria model
1️⃣ Set Compilers and Flags
Check compiler availability:
Export compiler environment variables:
Enable Fortran-10+ argument compatibility flags:
gcc_version=$(gcc -dumpversion | cut -d. -f1)
if [ "$gcc_version" -ge 10 ]; then
  export fallow_argument="-fallow-argument-mismatch"
  export boz_argument="-fallow-invalid-boz"
else
  export fallow_argument=""
  export boz_argument=""
fi
2️⃣ Create Installation Prefix Directories
Create a workspace for source downloads:
Set shared prefix for each library:
Create the prefix directories:
3️⃣ Download Sources
Download ZLIB:
Download SZIP:
Download JasPer (JPEG-2000):
Download HDF5:
Download NetCDF-C:
Download NetCDF-Fortran:
4️⃣ Build and Install Each Library
🔹 ZLIB
🔹 SZIP
🔹 JasPer
Regenerate configure scripts:
🔹 HDF5 (Serial build)
🔹 NetCDF-C
🔹 NetCDF-Fortran
5️⃣ Set Environment Variables
Add the following to your ~/.bashrc to make the libraries available:
cat <<'EOF' >> ~/.bashrc
# NetCDF libraries for VECTRI
export PATH=/opt/apps/libs/netcdf/4.9.0/bin:$PATH
export LD_LIBRARY_PATH=/opt/apps/libs/netcdf/4.9.0/lib:/opt/apps/libs/hdf5/1.12.2/lib:/opt/apps/libs/zlib/1.2.12/lib:/opt/apps/libs/szip/2.1.1/lib:$LD_LIBRARY_PATH
export CPATH=/opt/apps/libs/netcdf/4.9.0/include:$CPATH
EOF
Verify Installation
6️⃣ VECTRI Model Installation
Download VECTRI
Set Environment Variables
Verify the variables:
Persist Across Logins
Append to ~/.bashrc:
cat <<'EOF' >> ~/.bashrc
export VECTRI="$HOME/vectri"
export NETCDF_LIB="$(nf-config --flibs)"
export NETCDF_INCLUDE="$(nf-config --fflags)"
export FC="$(nf-config --fc)"
EOF
Create a Separate Workspace and Run
Why a Separate Workspace?
Running inside the repo pollutes the git tree and makes future git pull painful. VECTRI's run wrapper will also try to guard against this.
View command line options:
Run example simulation:
If the model compiles successfully, you should see:
- A compile phase producing
vectri.exe - Runtime logs (vector/disease, climate variable aliases, etc.)
- Simulation progress and completion status
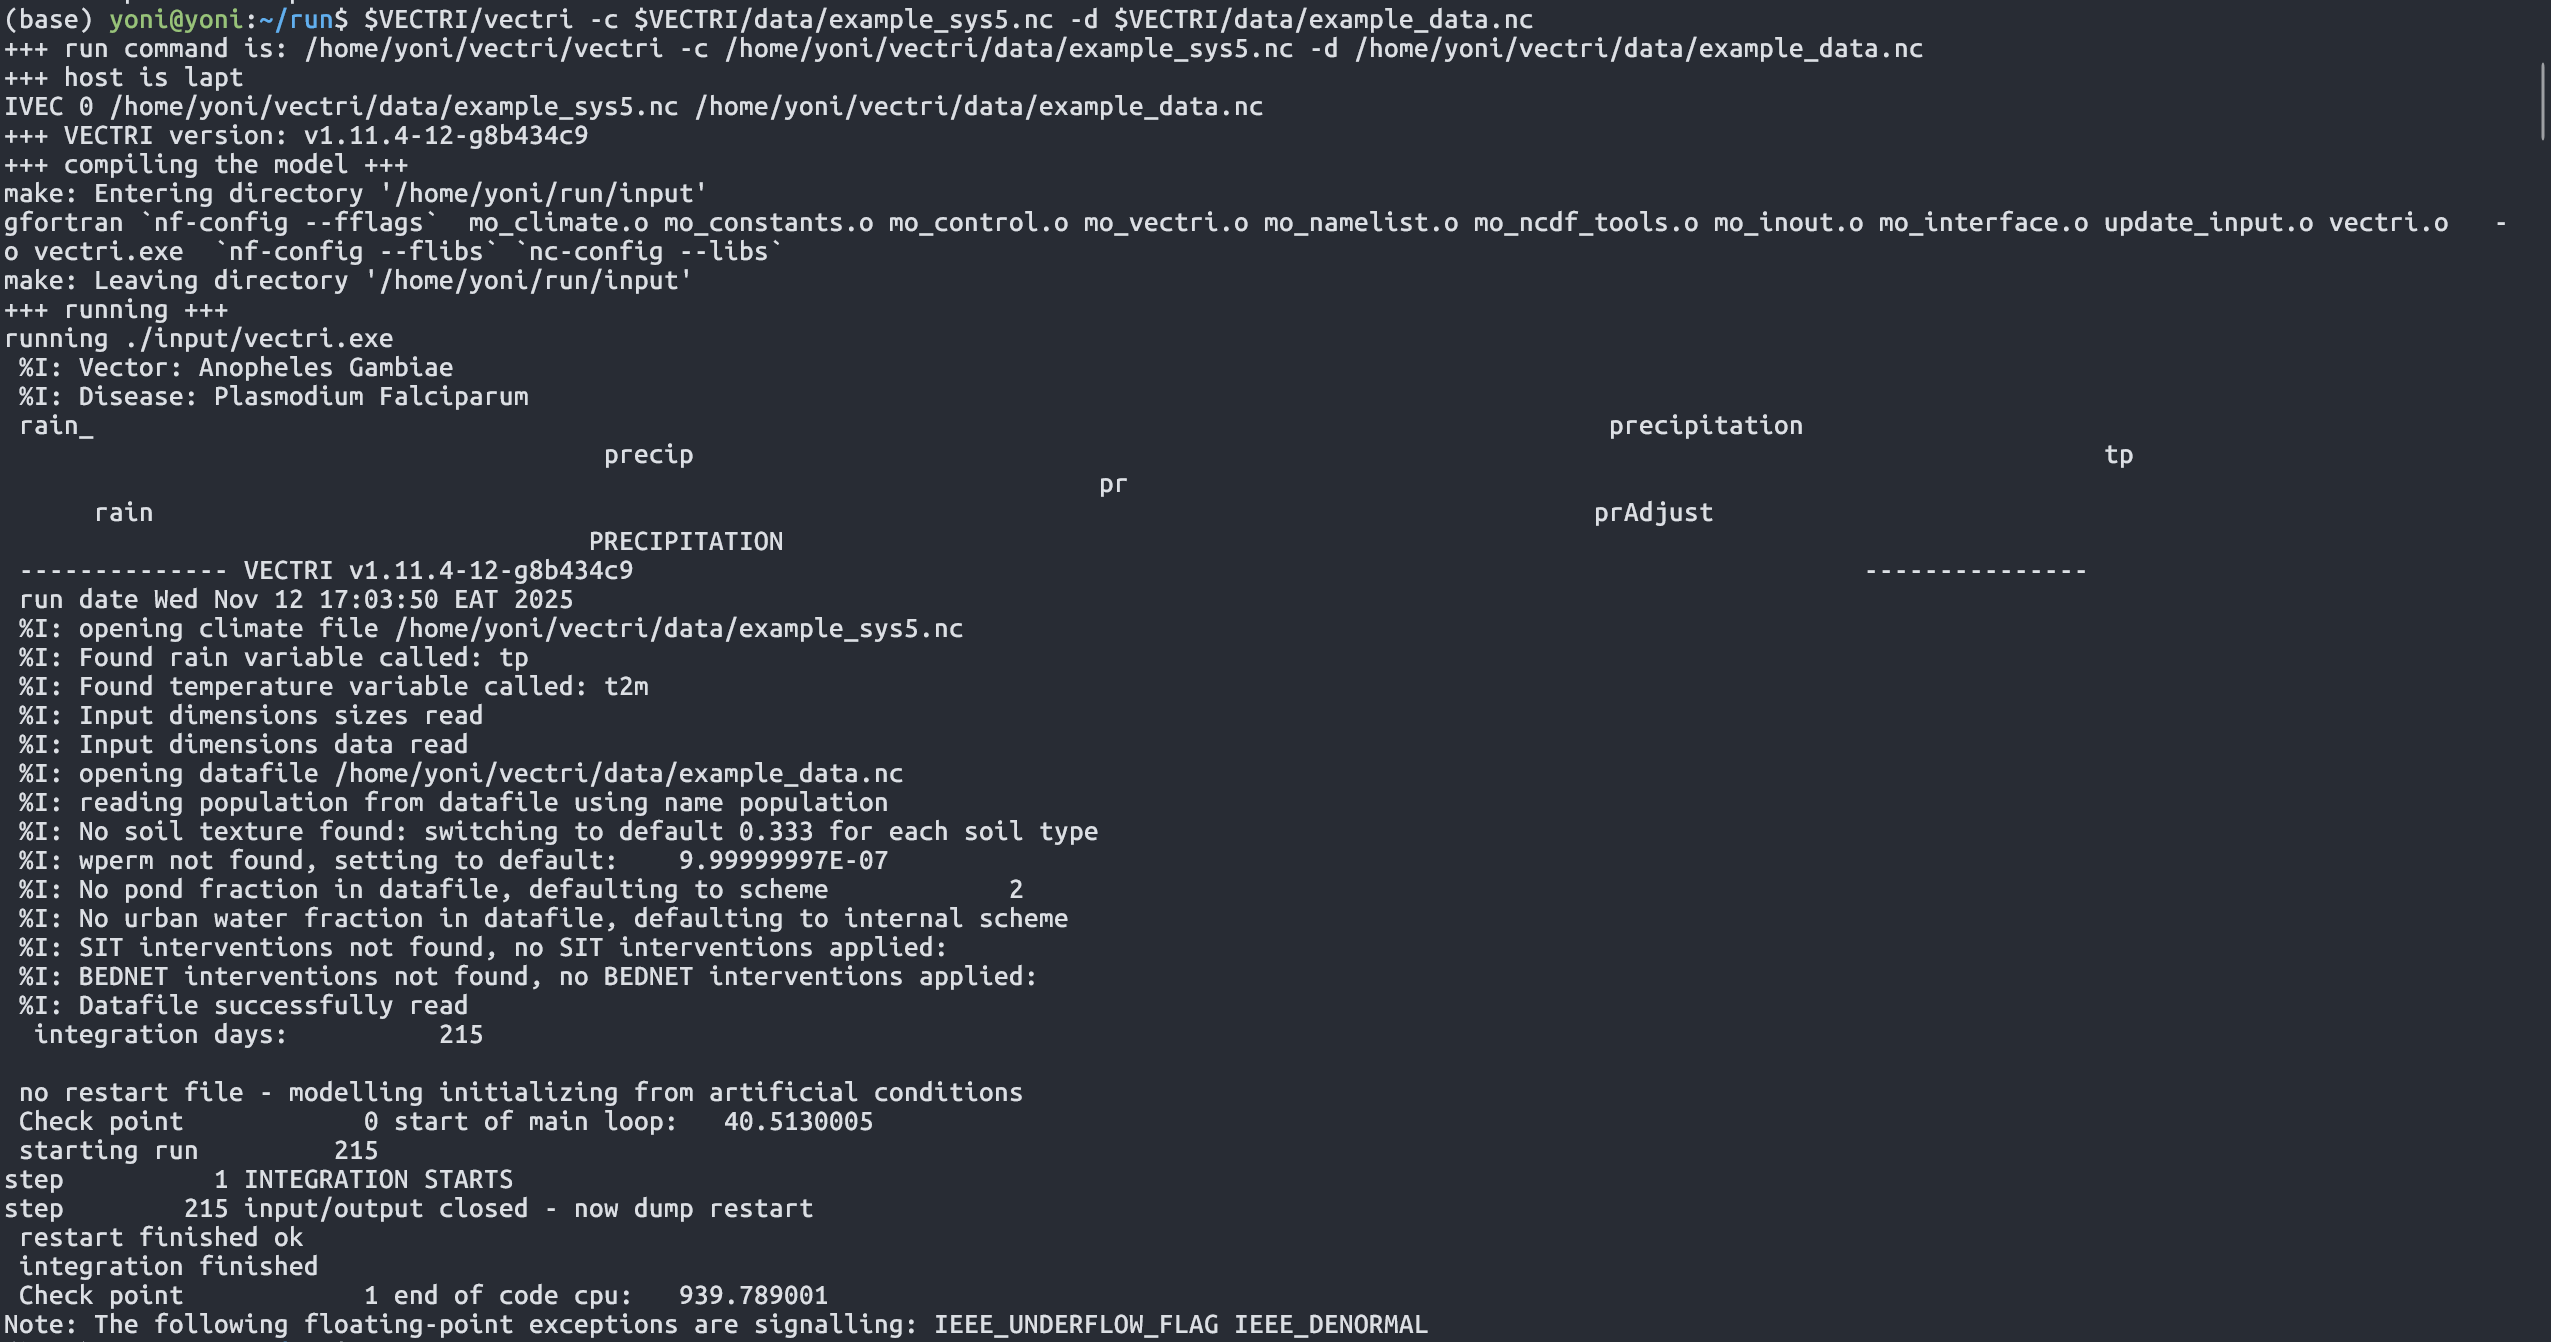
- If successful 🎉, typing
lsshould show the output filevectri.nc

7️⃣ Verification and Troubleshooting
| Check | Expected Result |
|---|---|
which nc-config | /opt/apps/libs/netcdf/4.9.0/bin/nc-config |
ldd vectri \| grep netcdf | Links to your local libraries |
echo $LD_LIBRARY_PATH | Contains all library paths |
Libraries Not Found?
- Verify paths in
~/.bashrc - Run
source ~/.bashrc - Check that all libraries compiled without errors
📖 Additional Resources
✅ VECTRI Setup Complete!
You now have a fully configured scientific environment for VECTRI on Ubuntu 22.04 LTS.
🐳 VECTRI Docker Image – User Guide
Run the VECTRI malaria transmission model using Docker
| Image | yonasmersha/vectri:latest |
| Repository | hub.docker.com/r/yonasmersha/vectri |
📌 Overview
This Docker image provides a clean, reproducible environment for running the VECTRI malaria model.
-
Preinstalled VECTRI
Ready-to-run VECTRI executable with all dependencies configured.
-
Required Libraries
NetCDF, HDF5, and Fortran libraries pre-installed and linked.
-
Example Datasets
Sample climate and population data included for testing.
-
Safe Execution
Non-root
vectriuserconfigured for secure container operation.
Why Use Docker?
- No installation required – Skip the library compilation process
- Reproducible – Same environment on any machine
- Portable – Works on Windows, macOS, and Linux
- Isolated – Doesn't affect your system configuration
✅ 1. Pull the VECTRI Docker Image
Use this command to download the latest stable build:
Verify the image was downloaded:
Expected output:
📂 2. Prepare a Working Directory
VECTRI writes outputs to a run directory. Create one on your host machine:
This directory will be mounted inside the container, allowing you to:
- Pass input files to VECTRI
- Retrieve output files after the simulation
▶️ 3. Start the VECTRI Docker Container
Run an interactive shell inside the image and mount your vectri_runs directory:
You should now see a prompt like:
| Flag | Description |
|---|---|
--rm | Automatically remove container when it exits |
-it | Interactive terminal mode |
-v | Mount host directory to container |
🧪 4. Run a Sample VECTRI Simulation
Inside the container, navigate to your mounted run directory:
Run VECTRI using example input files included in the image:
When successful, your folder will contain:
Output Location
This file is saved both in the container and on your host inside vectri_runs/demo_run/. After exiting the container, you can access the output directly from your host machine.
🧾 5. Understanding Input and Output Files
Input Files
| File | Description |
|---|---|
example_sys5.nc | Example climate forcing (temperature, precipitation) |
example_data.nc | Example demographic/environment data (population, land cover) |
Output File
| File | Description |
|---|---|
vectri_output.nc | Model results including EIR, vector density, etc. |
Inspect Output (Optional)
View the output file structure:
Or use Python (if available on your host):
🔁 6. Run VECTRI With Your Own Input Files
Step 1: Place Your Files in the Mounted Directory
On your host machine, copy your input files to vectri_runs/:
Step 2: Start the Container
Step 3: Run VECTRI
Inside the container:
Step 4: Access Results
Exit the container (exit or Ctrl+D) and find your results in:
⚠️ 7. Troubleshooting
Permission Denied When Creating Directory
This happens if you try to run VECTRI outside /home/vectriuser/runs.
Solution: Always work inside the mounted directory:
Output File Missing
Possible causes:
- The
-oargument path is invalid - The output directory doesn't exist
- VECTRI encountered an error during simulation
Solution: Check the console output for error messages and ensure you're in a writable directory.
Cannot Write to /opt/apps/vectri
This folder is read-only by design. It contains the VECTRI installation and example data.
Solution: Never run VECTRI simulations inside /opt/apps/vectri. Always use ~/runs.
Container Exited Unexpectedly
If the container exits immediately:
- Check Docker is running:
docker info - Try running without
-it:docker run --rm yonasmersha/vectri:latest ls - Check available disk space
🧹 8. Manage Docker Resources
Remove the VECTRI Image
Clean Up Unused Docker Resources
Check Disk Usage
📚 Quick Reference
| Task | Command |
|---|---|
| Pull image | docker pull yonasmersha/vectri:latest |
| Start container | docker run --rm -it -v "$PWD:/home/vectriuser/runs" yonasmersha/vectri:latest |
| Run example | vectri -c $VECTRI/data/example_sys5.nc -d $VECTRI/data/example_data.nc -o output.nc |
| Exit container | exit or Ctrl+D |
| Remove image | docker rmi yonasmersha/vectri:latest |
📖 Citation
If you use VECTRI in research, please cite the original authors:
VECTRI Citation
Tompkins, A. M., and F. Di Giuseppe (2015), Potential predictability of malaria in Africa using ECMWF monthly and seasonal climate forecasts, Journal of Applied Meteorology and Climatology, 54(3), 521-540.
VECTRI – A dynamical malaria transmission model
International Centre for Theoretical Physics (ICTP)
👤 Contact
-
Maintainer
Yonas Mersha
-
Issues & Requests
-
Docker Hub
VECTRI Docker Ready!
You can now run VECTRI simulations without installing any dependencies. For manual installation (building from source), see the VECTRI Installation tab.